![]()
Hearme Data structure
Hearme's solution has a flexible structure that can meet diverse usage needs, scales, and business structures.
For small-scale businesses or organizations, individuals can use a personal account where one person is responsible for all roles in the system.
For large-scale businesses or organizations with the need for permission and hierarchical data, a role-based model can be applied.
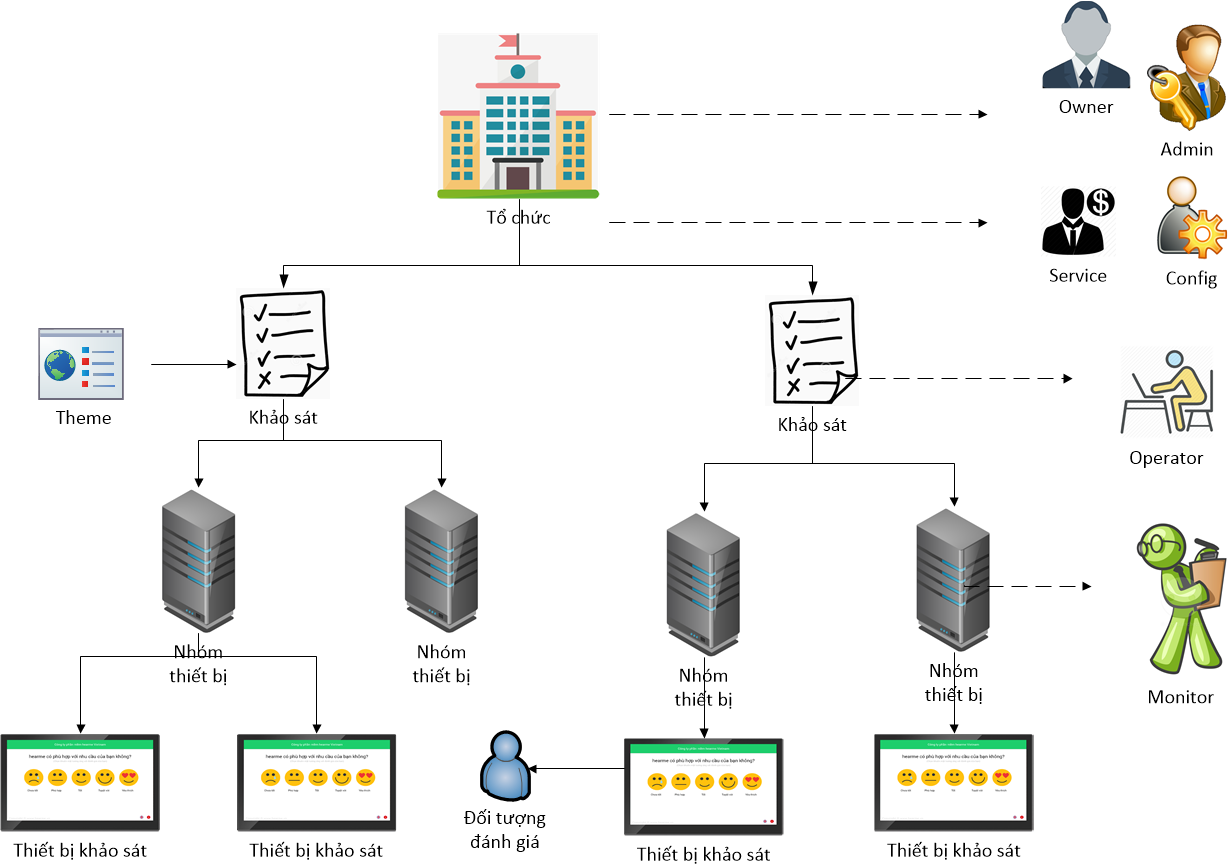
Administration System
Administrators can manage the entire system's operation, including viewing reports, setting up questions through the Hearme app, or logging in through the website https://hearme.vn
Administration page
Entire administration can be categorized into the following functional groups:
Survey Configuration Group
This group is related to displaying surveys on the screen for customers to rate quality and services.
- Survey Management: Initiate and manage survey questions.
- Device Group Management: Initiate and manage device groups.
- Device Management: Manage devices connected to the system.
- Collection Management: Manage images used in the app, such as logos, product images, and staff images.
- Module Management: Configure image/video slideshow features in Feedback kiosk.
- Theme Management: Configure the interface of CSAT, NPS, CES, and FLX surveys.
- Feedback Object: Manage feedback objects associated with each device.
- Thank You Message: Manage thank-you messages after customers complete surveys, including greetings for web surveys.
- System Configuration: Set up advanced features.
Detailed information can be found here
Integration Configuration Group
- Configure Integration Hooks
- Integration Report: Build advanced reports.
- Feedback Processing Module Integration
- Zapier Integration Tool
- Programming Tools, SDK
Detailed information can be found here
Customer Management Group
- Customer Management: Enter customer information to send surveys via email.
- Invite Reviews: Send review invitations along with customer information to review kiosks.
- Survey Invitation Management: Record the survey sending history of customers.
- Reward Code List: Save customer reward codes after completing surveys.
- Points Program: Create point reward programs for customers based on each survey.
Detailed information can be found here
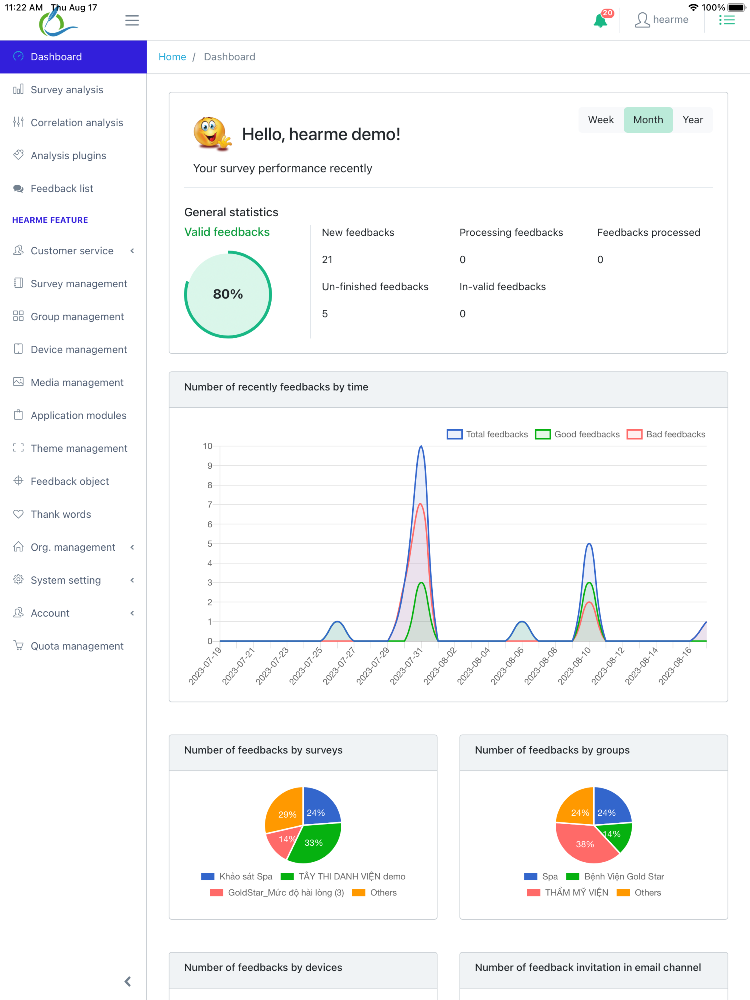
Data Analysis and Reporting Group
- Dashboard: Provide the most comprehensive reports on system performance.
- Survey Analysis: Display survey results in charts, with each chart corresponding to a question type.
- Correlation Analysis: Analyze the correlation between customer satisfaction scores and factors influencing product/service quality.
- Advanced Analysis (If the Report plugin feature is configured): Display extended analyses in the administration system.
- Feedback List: Show real-time customer feedback. The system allows exporting raw evaluation data to an Excel file for customer processing.
Detailed information can be found here
Survey Management
Depending on each campaign and survey purpose, businesses can create different survey flows by selecting the appropriate index type and asking relevant questions to understand whether customers are satisfied or dissatisfied and for what reasons.
In this functional group, customers can perform the following operations:
- Create and manage surveys
- Export surveys to files for storage
- Import surveys from files
- Create survey flows from templates available in the system
- Delete or edit surveys
Detailed information can be found here
Device Group Management
To easily manage each department, location, or store, for each survey campaign, businesses can group devices, each group consisting of multiple feedback-sending machines. In a group, devices will run the same survey.
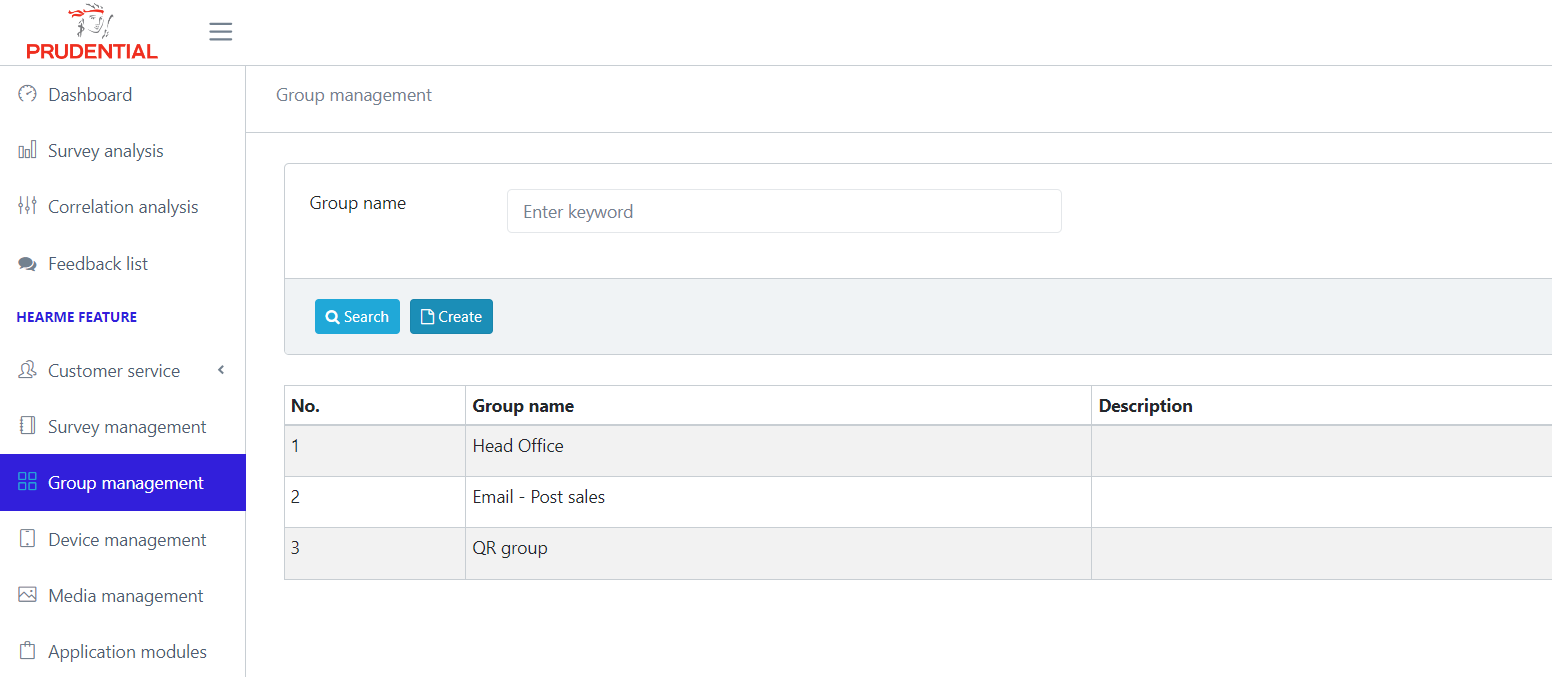
Group Management
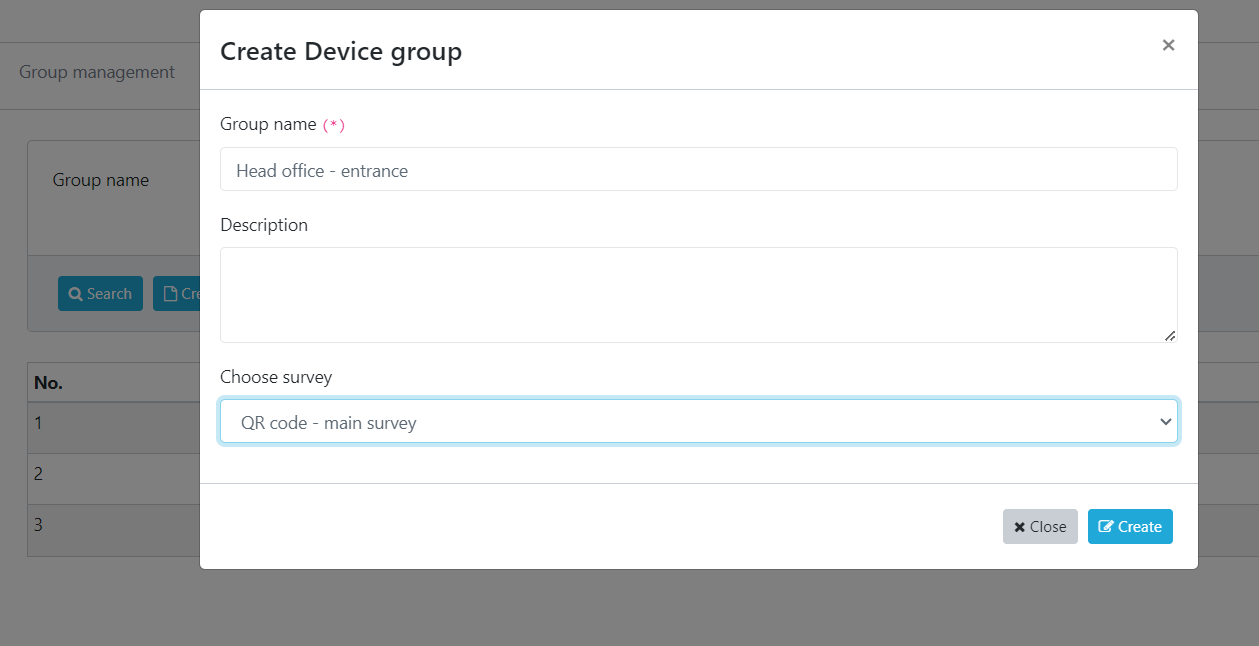
Clicking on the "Group Management" -> "Create" button, a dialog will appear for you to name the device group.
For example, if you have a store in Hoan Kiem, one in Xa Dan, and another in District 1 in Ho Chi Minh City, you can create three groups: Hoan Kiem, Xa Dan, and District 1 to manage these three stores.
Add group
After naming the group, click "Add New" to create the group. The Description section can be left blank or filled with information to remind about the function of this device group.
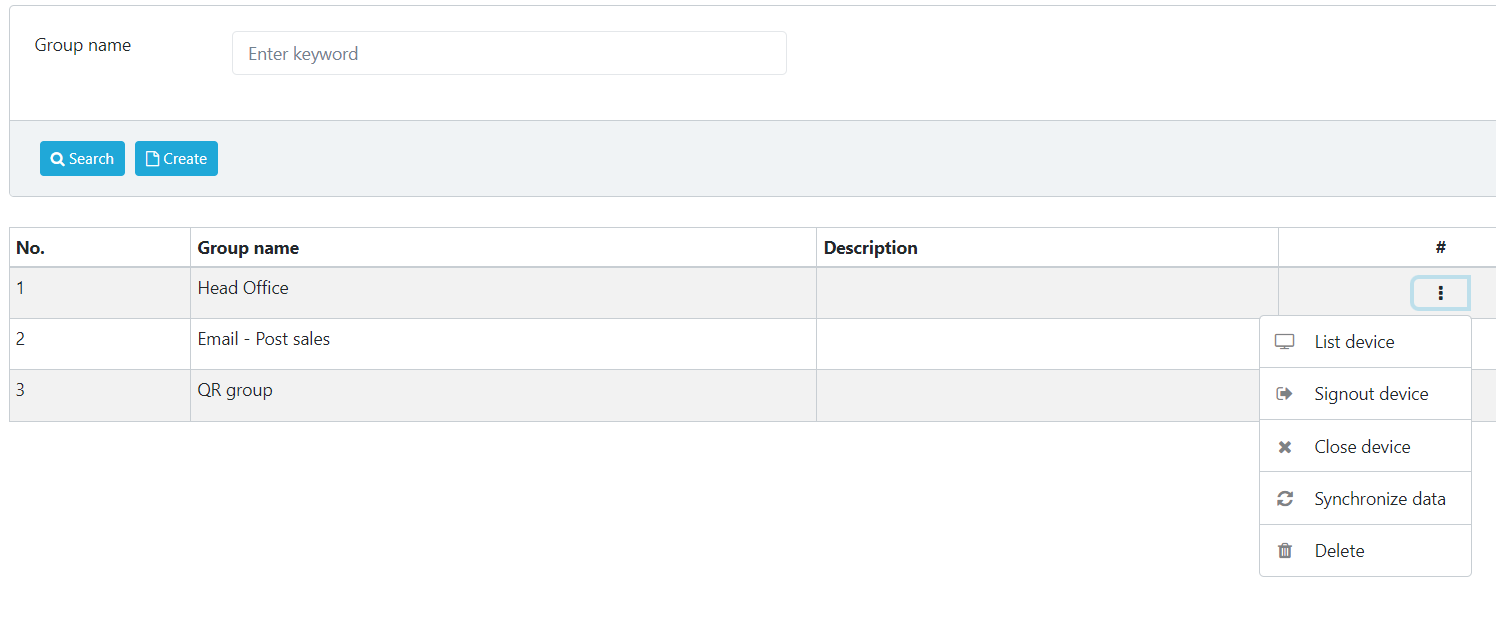
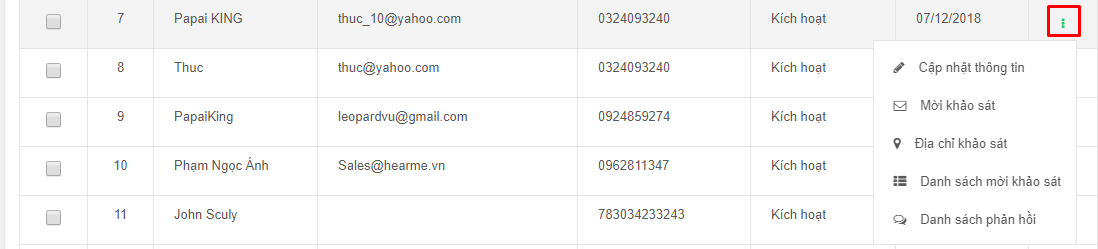
Clicking on the ... icon at the end of each device group, you can see the following functions:
- Device List: Display the number and list of device names currently set up in the group.
- Update: Change the name, status, and survey running in the group.
- Logout: Log out for all devices in the group.
- Close Device: Turn off all Hearme Station applications on the devices in the group (Only applies to devices running the Android operating system).
- Data Sync: Devices will retrieve adjusted configuration data on the management system.
To update group information, just click into that group.
Device Management
Each device corresponds to a channel that you will use to collect customer feedback. There are three types of devices:
- Kiosk Channel Device: Equivalent to a feedback-sending machine, which can be a tablet/phone with the Hearme Station app installed.
- Website Channel Device
- Email Channel Device
In the "Device Management" section, you will see a list of devices in the system and the channel types used to collect customer feedback.
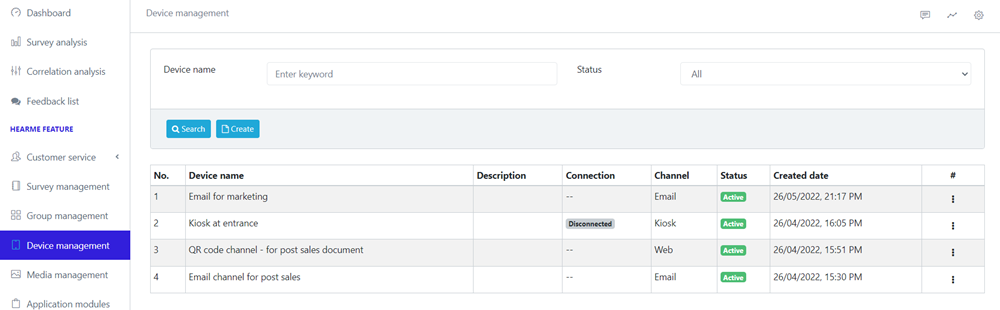
Device Management
To add a new device, select "Add New," and a dialog will appear.
-Set the device name -> Choose the survey type -> Select a group -> Click "Add New."
Regarding the survey type, you will have:
- Kiosk: Used for customers to give direct feedback through a device placed at the service location.
- Website: Used to create a website (link) so that customers can access and evaluate service quality on the website through a computer or phone.
- Email: Used to send surveys to customers via Email.
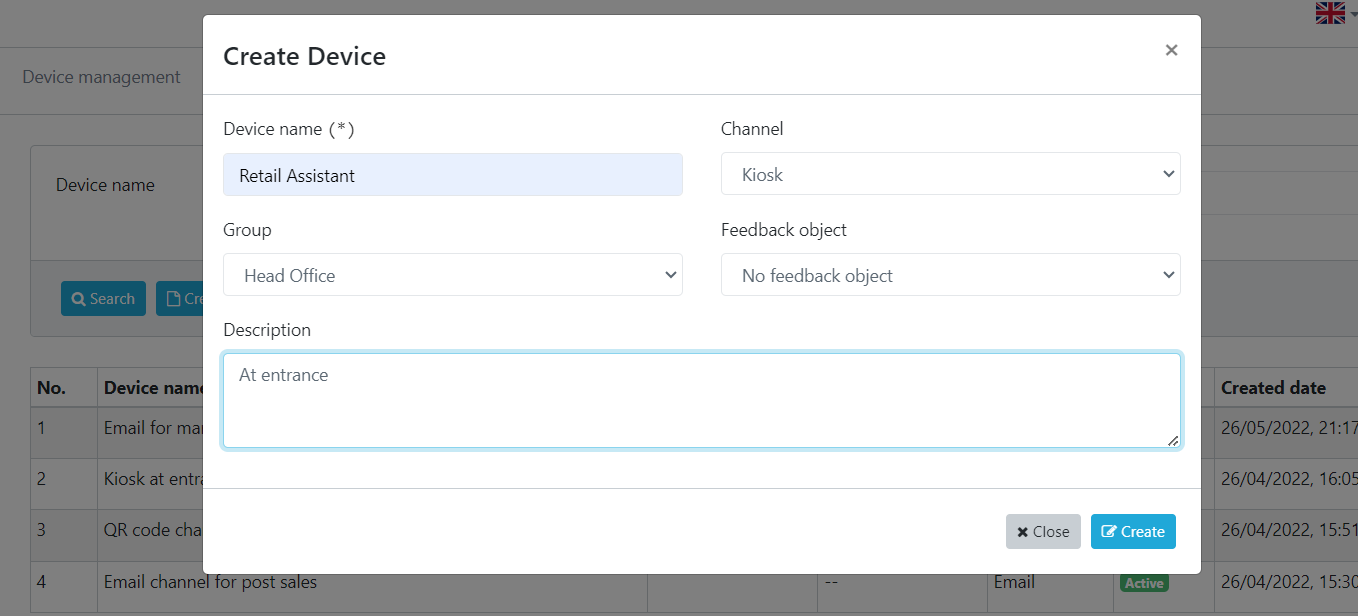
Add new device
Once the device is created, its status is always set to "Newly Created."
Kiosk Survey Channel
Device Management
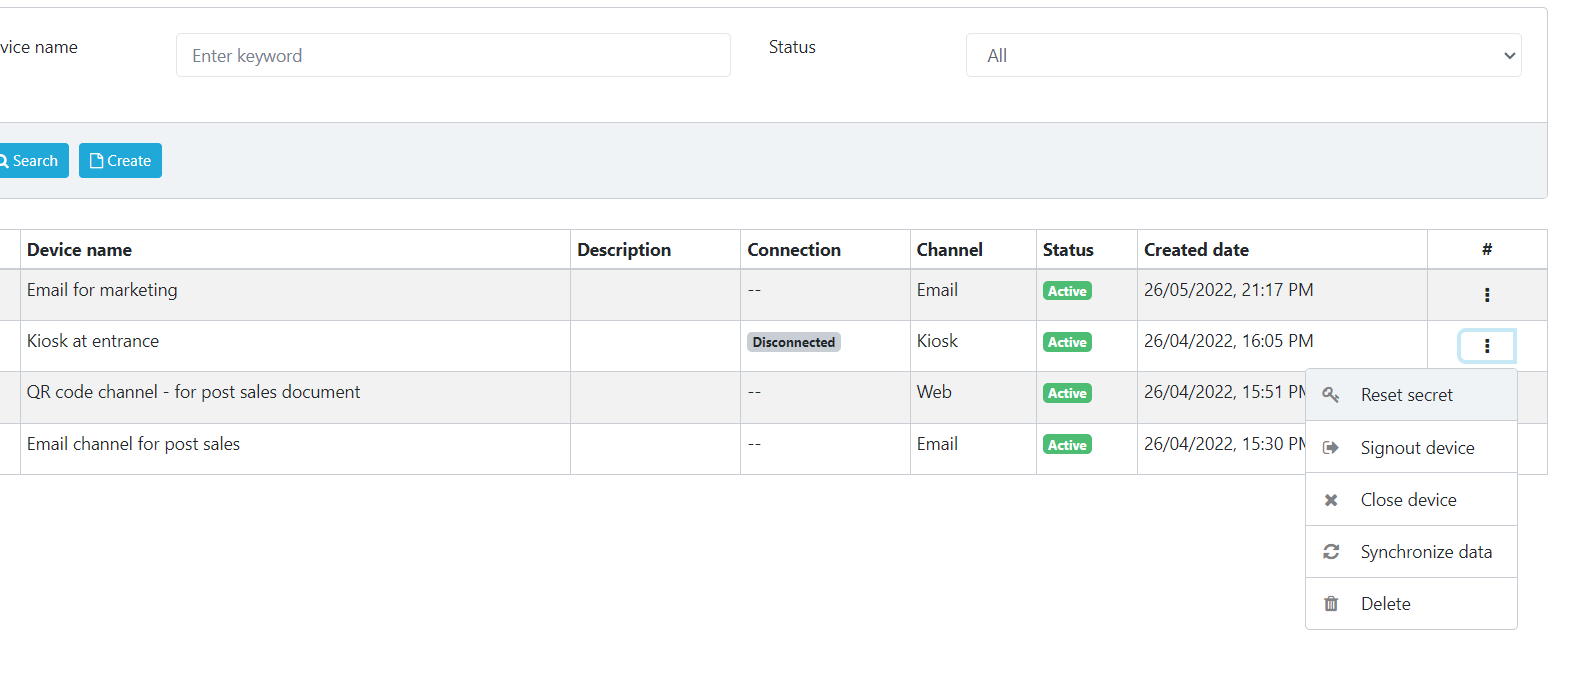
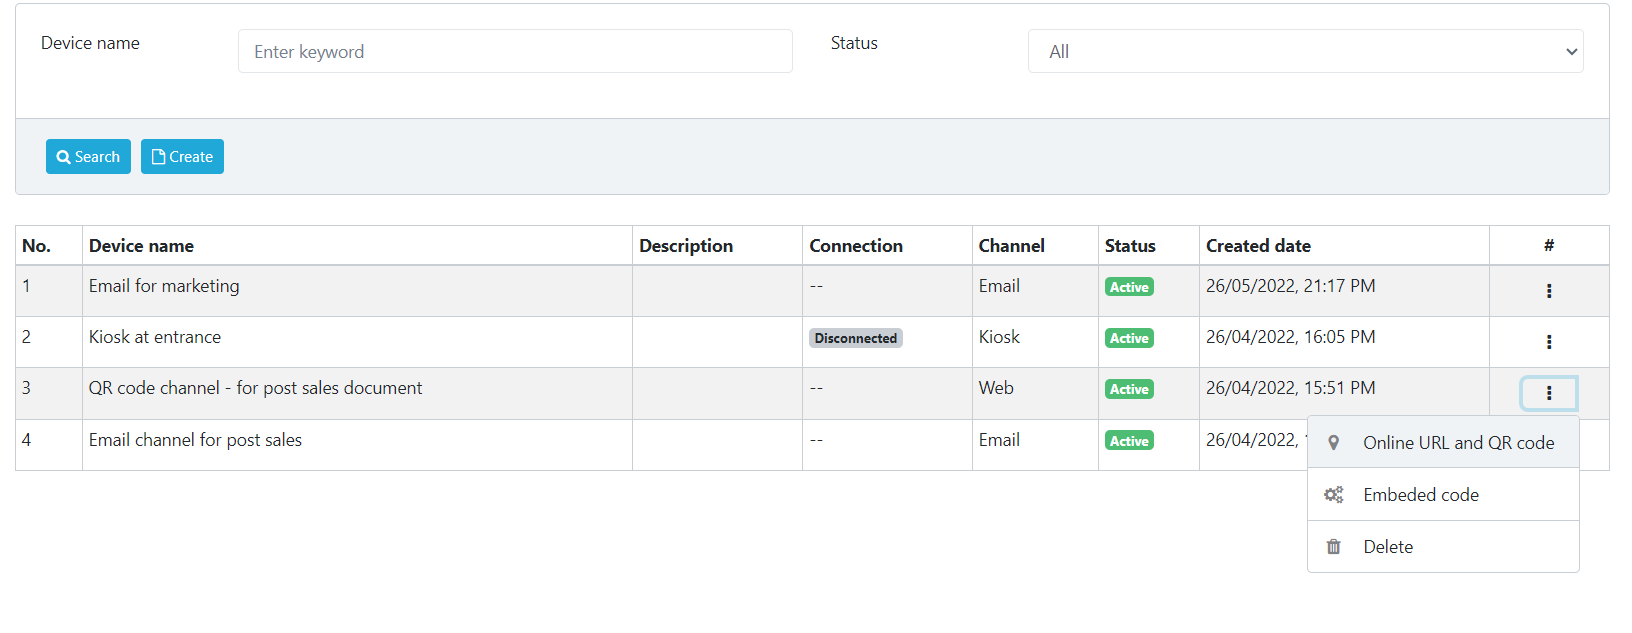
Clicking on the icon (...) at the end of each device, you can access the following functionalities:
- Reset secret:
Purpose: Generate a new security code for the device to connect Hearme Station to the system. The system will create a device code and security code. You can use this information to connect a device with the Hearme Station app to the system.

Device secret code
- Logout: Disconnect the device from the system.
- Close Device: Cease receiving feedback from the Hearme Station app on the device and in the system.
- Sync Data: Synchronize configurations for surveys between the system and the device. Update feedback stored on the device to the system.
- Delete: Remove the device from the system. Activated and in-use devices cannot be deleted.
Web Survey Channel
When you create a device for the web channel, the system generates a webpage (link) for you. Customers can access this webpage to participate in surveys.
Web Survey Channel's functions:
In the menu (...) at the bottom of the device, a menu appears with the following functions:
- Get Survey Link: Obtain the survey link and QR code.
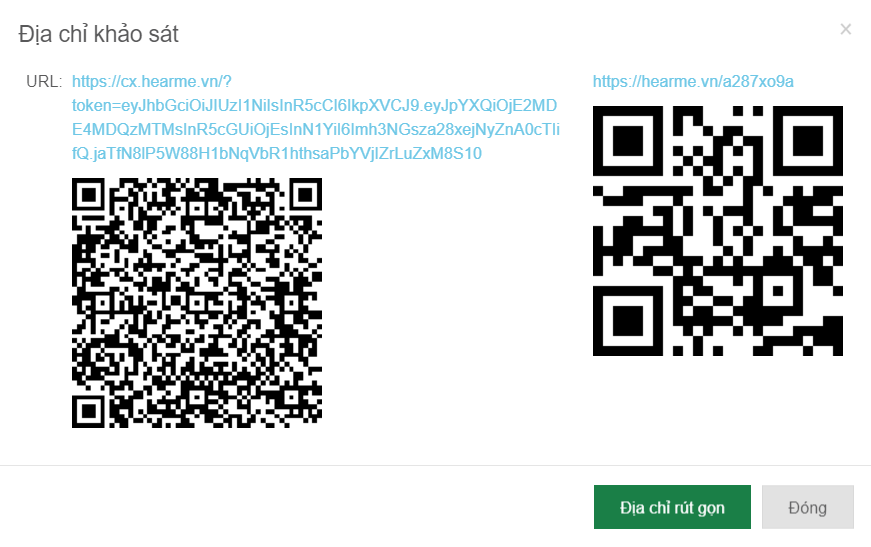
Survey Link and QR Code
You can share this link or QR code on Facebook, websites, or through email to allow your customers to participate in the survey. The process of obtaining the link and QR code is straightforward.
- Get Embed Code: Generate an embed code that allows you to integrate the web survey channel into any desired website.
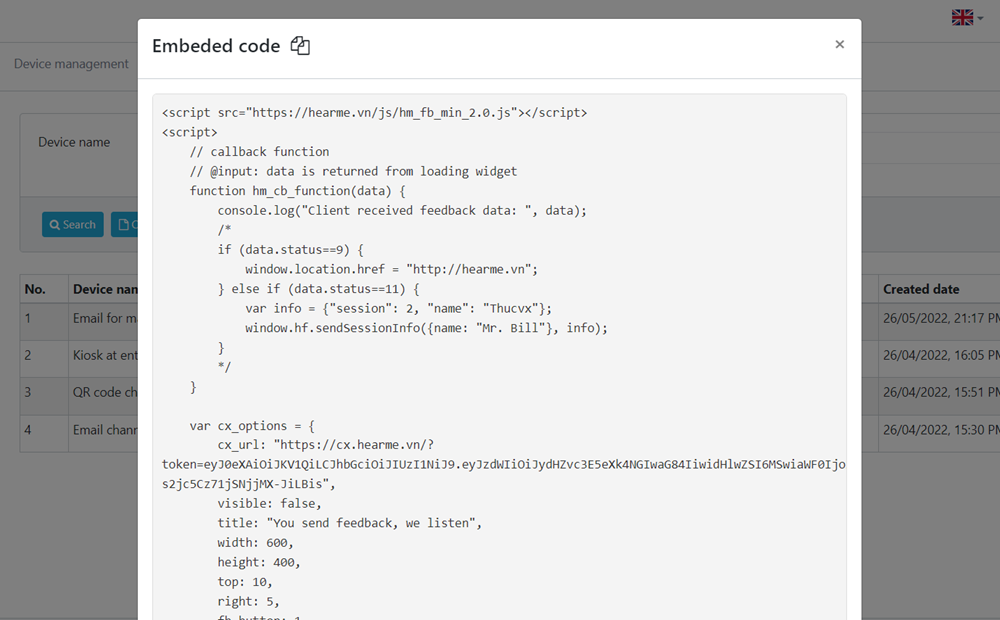
Embed Code
Copy and paste this embed code at the end of the webpage where you want to integrate the survey, just before the </body> tag.
You can add parameters into this survey link. Extra information in these paramters can be devide in two types:
- Parameters to control survey page: such as default language, trademark sign...
- Parameters to provide extra information. It's will be attached into customer feedback, and can retrive later by feedback API. Extrac information can be: user id, session id, customer information... This technique can be used to dishtinguide survet links between users and these links can be distributed to user through email marketing platform.
For more information, refer to integration document for online channel
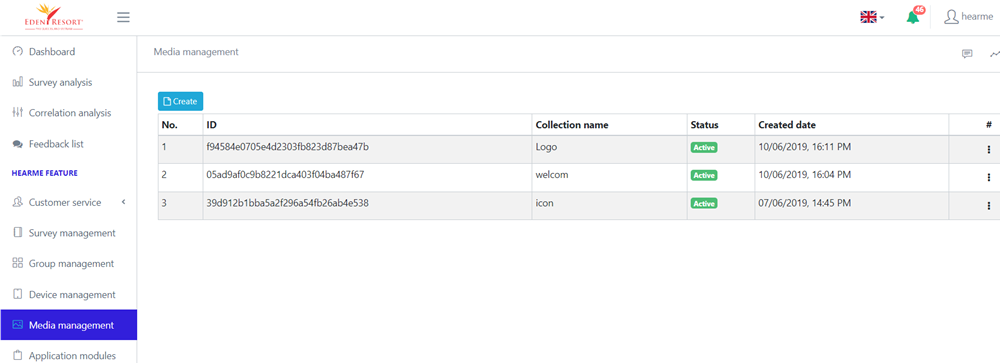
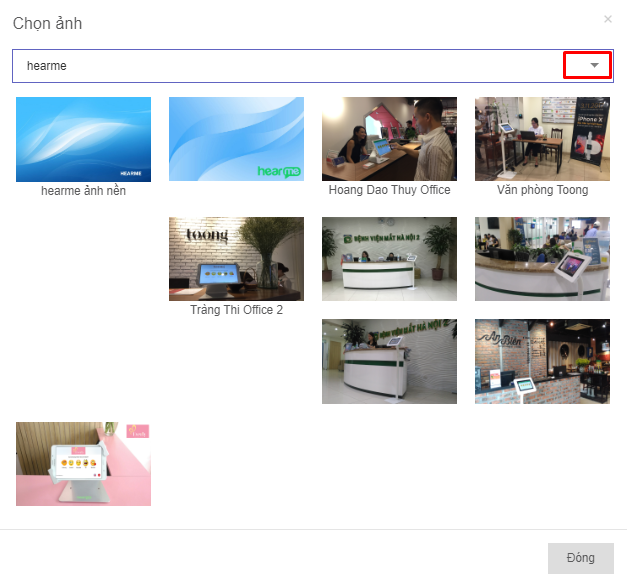
Collection Management
This function is used to manage centralized image resources for various purposes: images in the survey screen, image slides in the waiting screen of the kiosk device, background images, logos, banners.
 Collection Management
Create a Collection
Choose: Collection Management -> Add New. Add New Collection Add New Collection
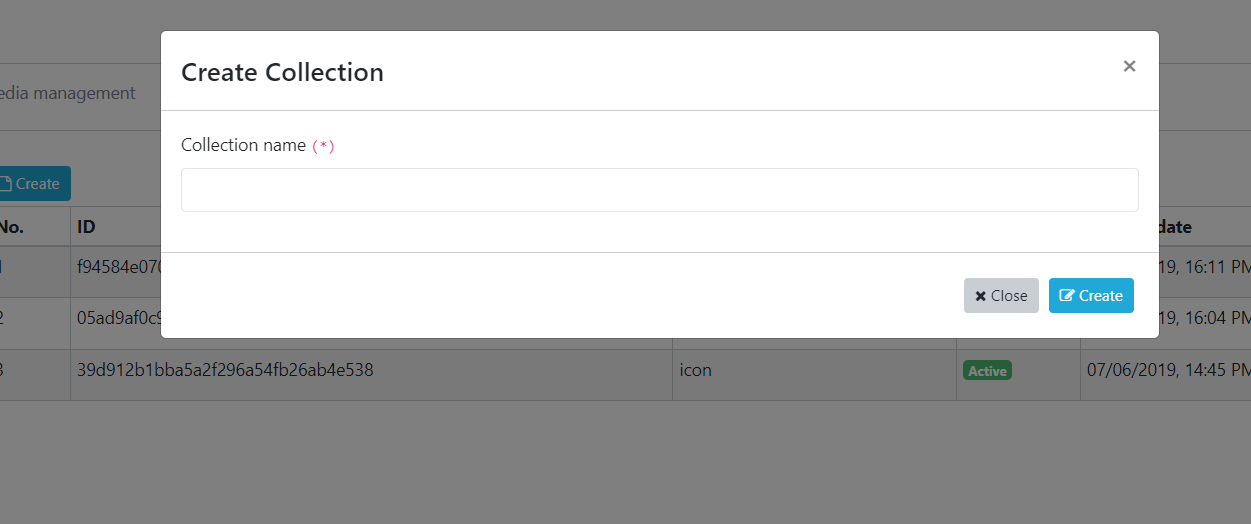
Add new collection
Input name of the collection, then Add New. The system will generate an ID for the collection at this point.
Update Posted Images
Click on the created collection to add images. The images uploaded first will be displayed first. You can also change the display order by dragging and dropping the image positions.
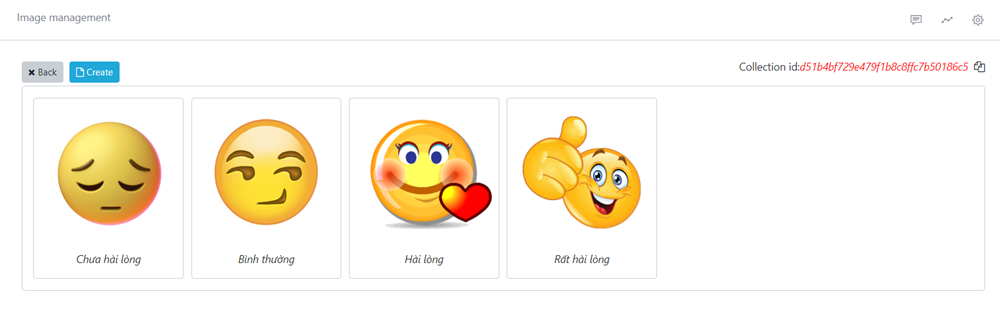
Image list
Once images are uploaded to the collection, you can rename, delete, or change the position of images in the collection by clicking on the image.
Application Modulels
In addition to the survey feature, Hearme integrates a collection feature that allows displaying images or videos on the kiosk screen when there are no customer reviews. Initially, the Hearme app only displays the survey feature.
If a business wants to display additional collections or videos stored on YouTube, they can go to the "Application Modulels" section to configure as desired:
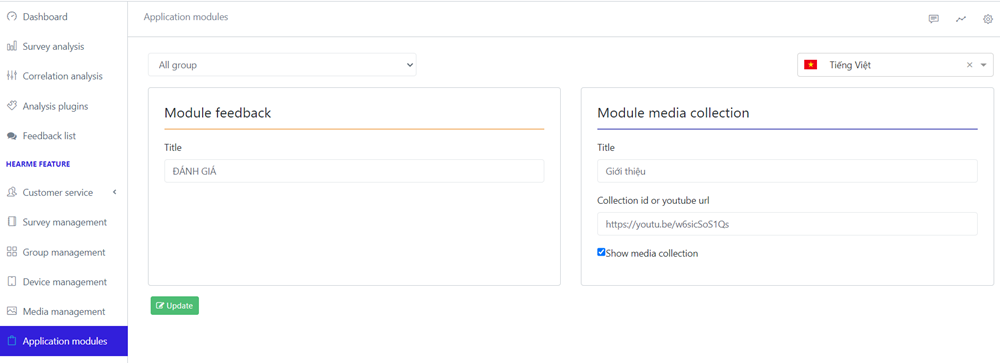
Configure YouTube Video Display
In the "Collection id or YouTube URL" section, enter the ID of the collection you want to display or the YouTube video link, and check the "Show media collection" box.
When you want to turn off this feature, simply uncheck the box and select "Update" to save it.
You can apply the collection feature to all devices, a device group, or specify it for a single device.
After making changes, click "Update" to save the changes.
The collection feature is only displayed on tablets, smartphones. For small-screen devices, only the survey function is displayed.
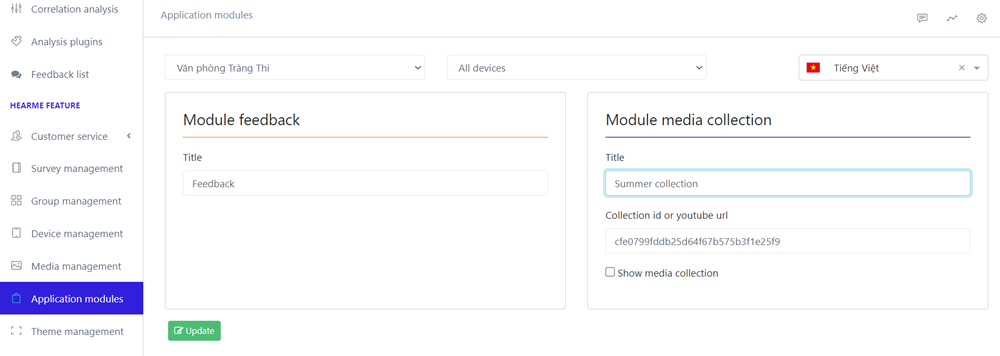
Assigning a photo collection to a device
Theme Management
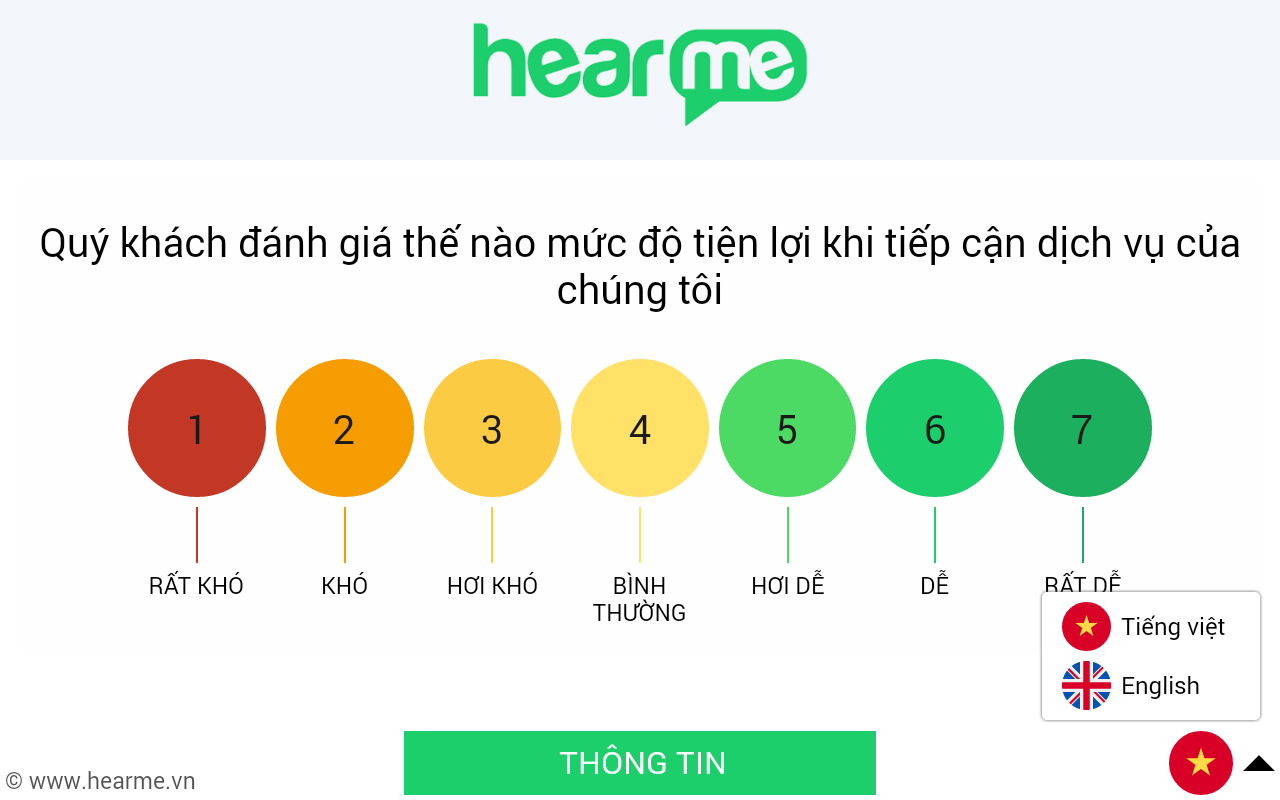
Themes (interface templates) are used to set up how the survey screen is displayed to match the function and scenarios when customer surveys are conducted.
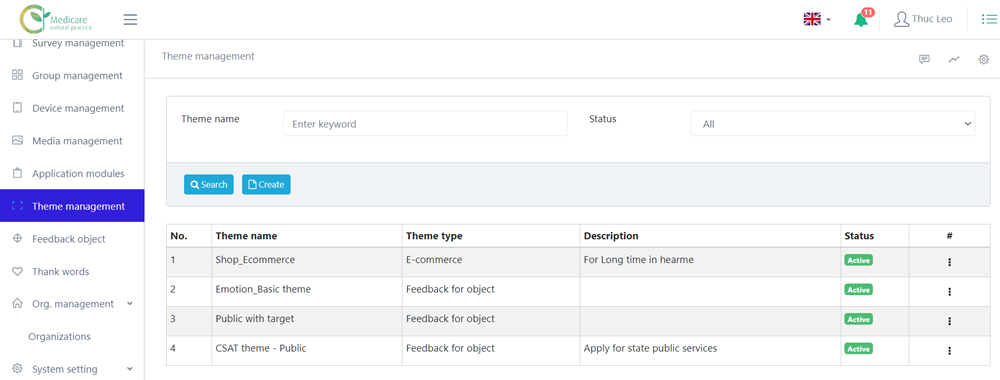
Manage Themes
A regular survey, when not configured with a theme, will use the default interface set up according to the background and header images in the "System Configuration -> General Configuration" section.
Each theme can be applied to specific surveys.
To add a new interface template, go to the "Theme Management" section -> select "Add New."
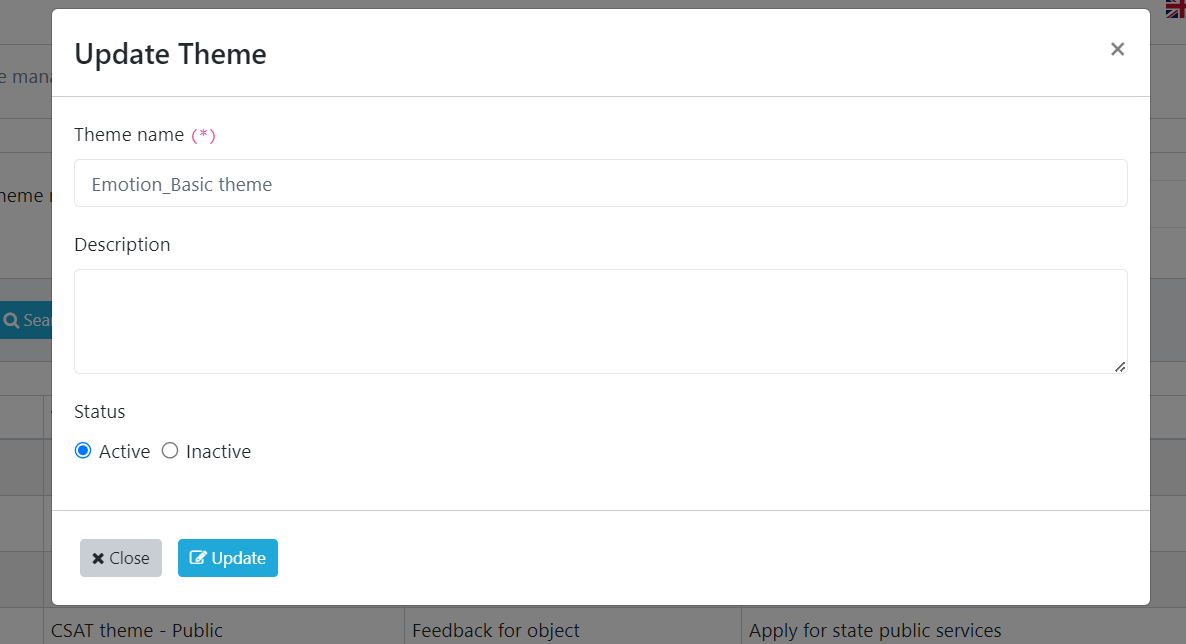 Add New/update theme
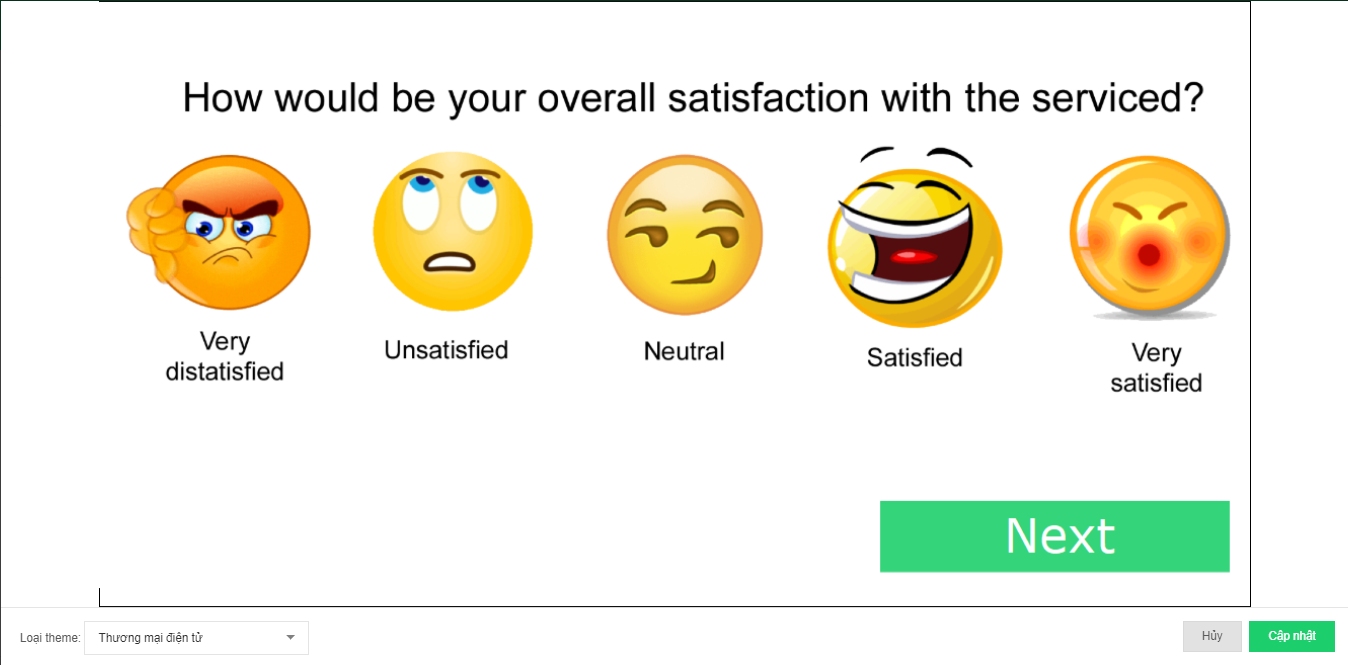
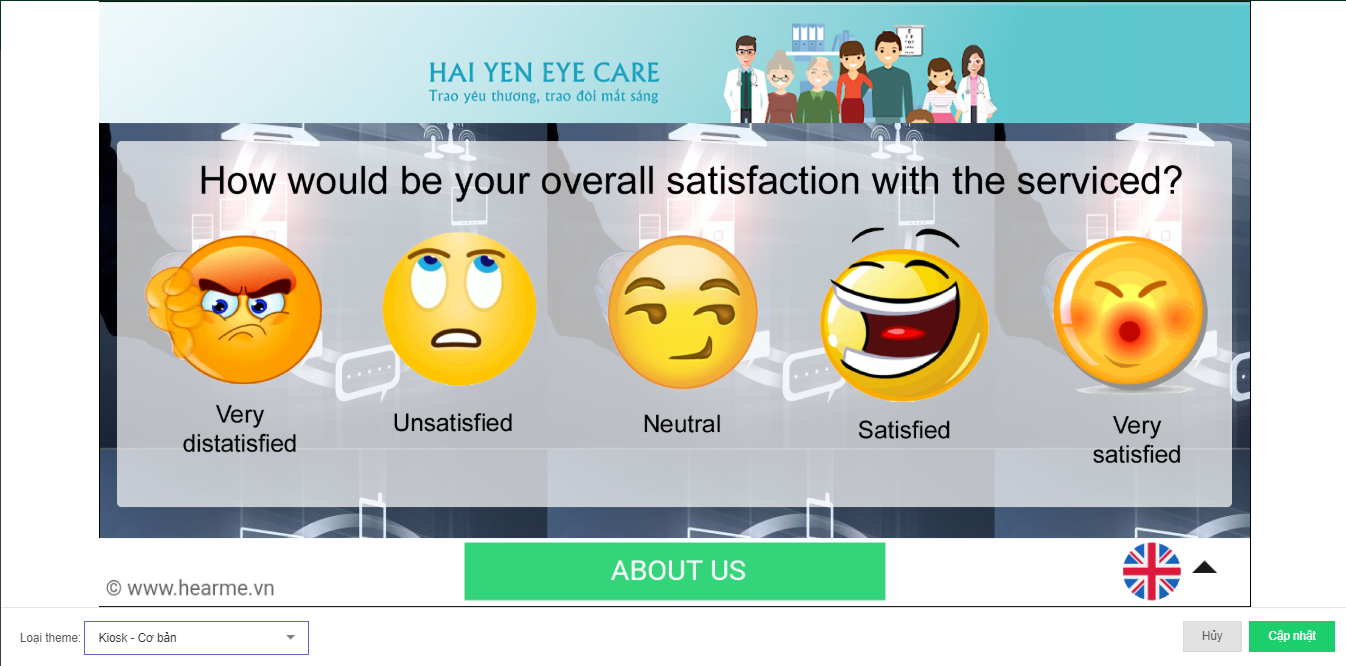
After selecting "Add New," a demo screen will appear for you to configure the theme. The configuration includes adding header images and background images.
Configuring the theme involves selecting the theme type, header image, and background image. Before setting up the header and background images, you need to prepare the images and upload them to the "Collection Management" section.
Types of Themes
There are three types of themes used in the hearme system:
- E-commerce Theme: Applied to all types of surveys.
This theme is commonly used for e-commerce pages, online stores, and websites. It features a white background without a header image. No additional configuration is needed for this theme.
- Basic Theme: Applied to all types of surveys.
This theme is used to customize the background and header images of the survey. If a supplement surveys does not have a header image, header image will not be displayed on the survey screen.
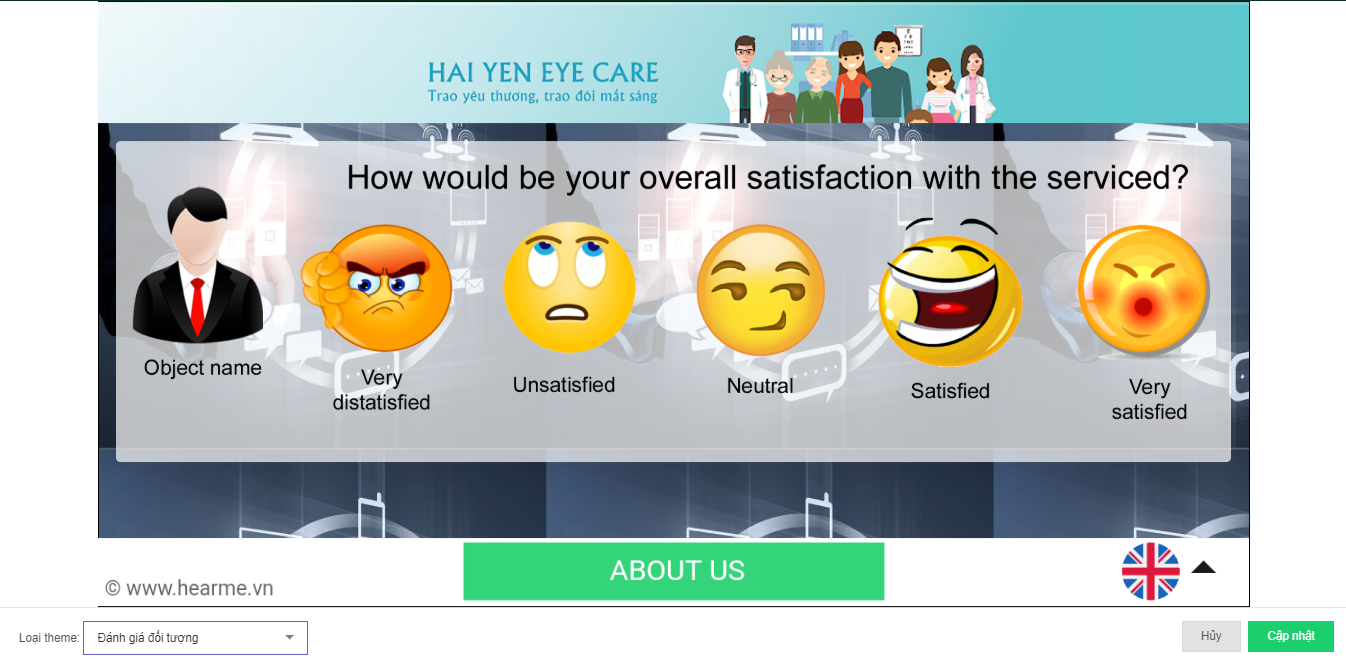
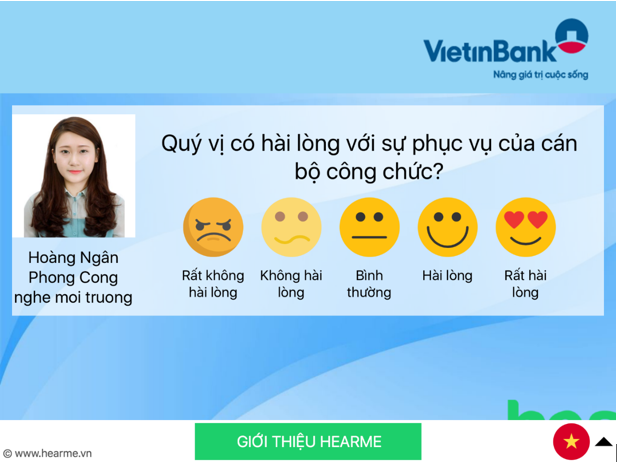
- Object Evaluation Theme: Applied to CSAT and FLX surveys (with ratings from 5 and below).
This theme is used when a device is assigned to collect feedback about a specific object - person. For example, a bank evaluates a teller, or a government agency evaluates an officer. Next to the evaluation icons, there will be an image of the personnel being evaluated.
Setting Header Image
The header image is the uppermost image on the survey, typically used for placing logos or banners.
Right-click on the header image area and select "Set header image."
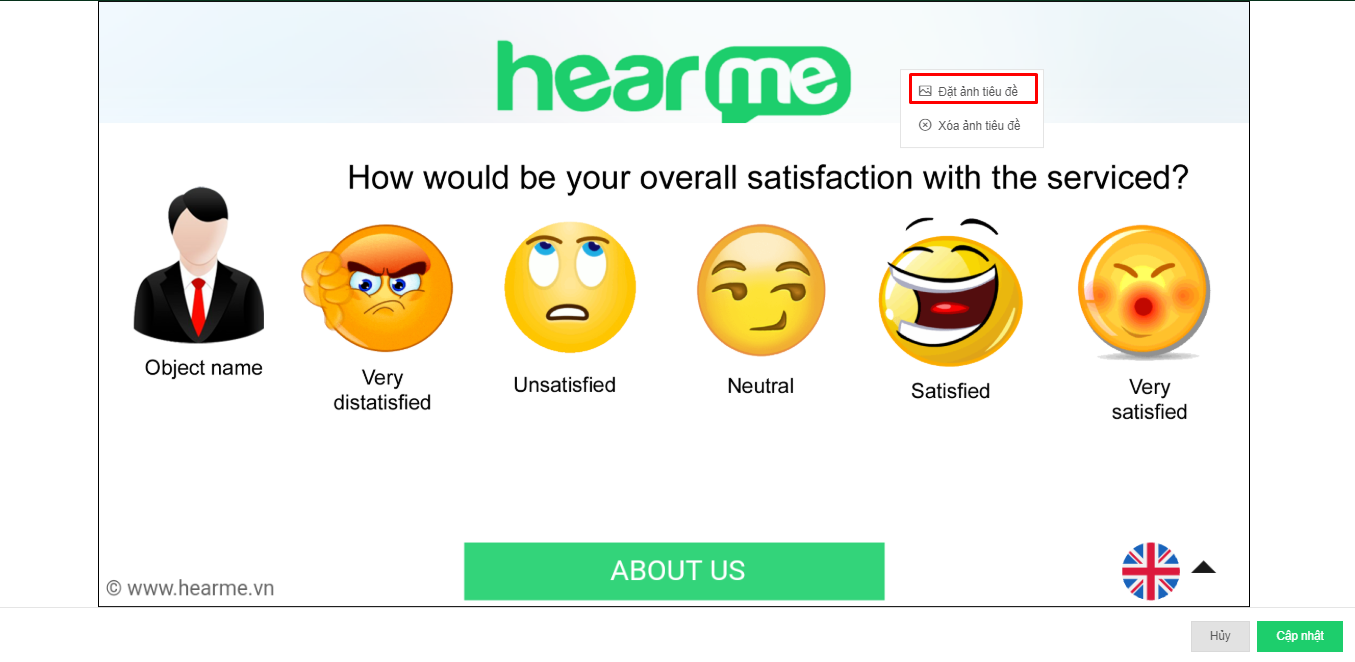
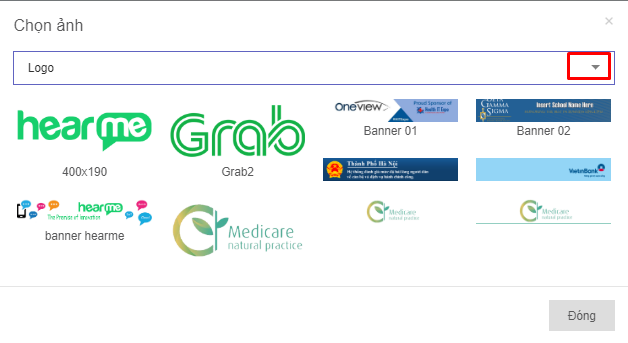
A new window will appear for selecting the header image. Choose from the collection that contains the prepared images.
Setting Background Image
The background image is the image that will be displayed behind the survey questions. The size of the background image is designed based on the screen resolution of the kiosk device.
Click on "Set background image," and a new window will appear.
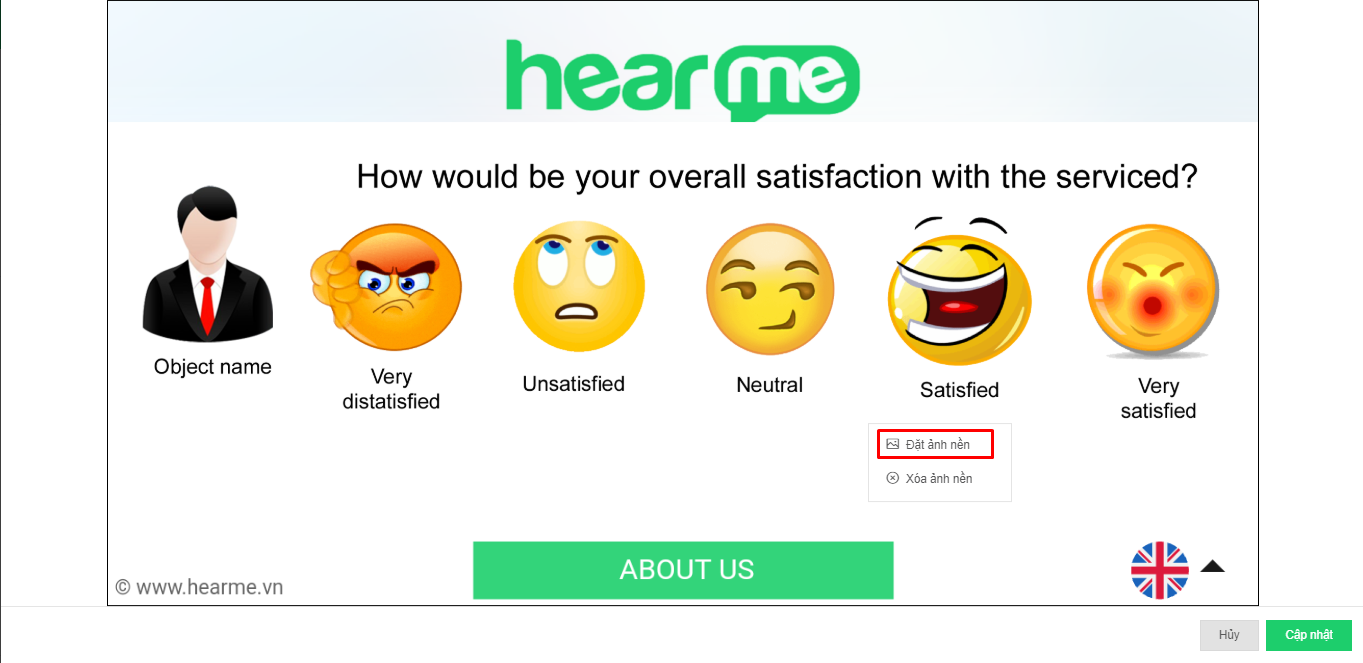
Choose the collection that contains the uploaded background images.
Feedback Object
In use cases such as public administration or banks, each employee at the counter will have a separate evaluation device. Feedback objects help identify for whom that evaluation is intended.
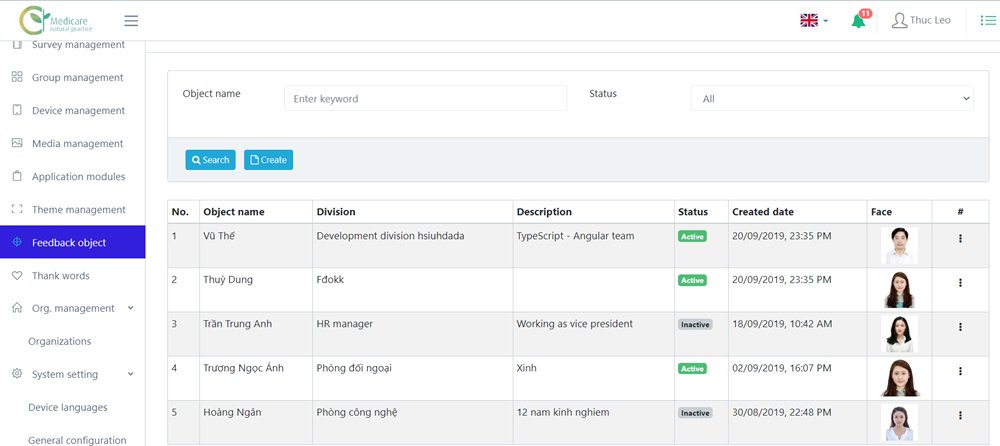
Clicking "Add new" will open a dialog to create a feedback object. Choose an image and fill in the details of the object.

Click "Add new" to complete adding the object. You can update the information of the object, such as name, department image, and status, by clicking on the corresponding feedback object row.
Note: Feedback objects are only displayed on the CSAT, FLX survey screens (with ratings from 5 and below) when you set the mode to use a theme for each survey type and select an object for the device.
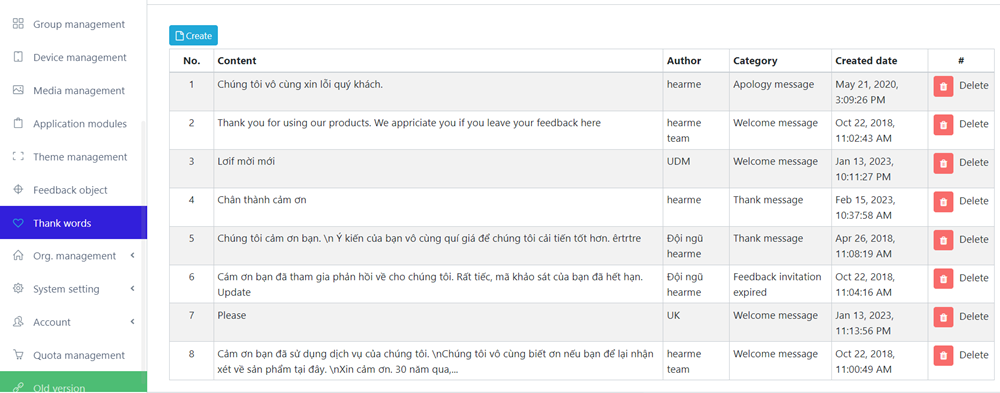
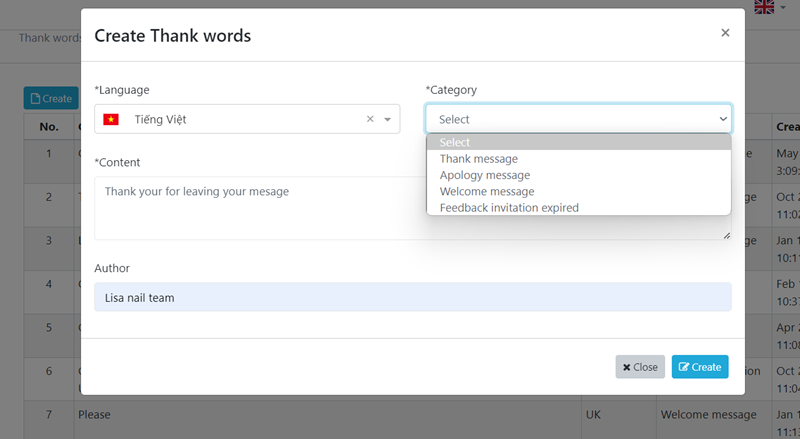
Appreciation Messages
You can configure the system so that after customers complete the evaluation, the survey screen will display an apology or a corresponding appreciation message when customers rate the product/service poorly or well.
You can also update additional business appreciation messages by selecting "Add new" in the "Thank words" menu.
Setting up Appreciation Messages:
Appreciation message
Click "Add new" to create a new appreciation message.
Add New message
Select the type of message:
- Appreciation Message: Used on all channels after completing the survey and receiving a good rating.
- Apology Message: Used on all channels after completing the survey and receiving a poor rating (with a warning).
- Feedback Invitation: Used for the Email survey channel, web before customers take the survey.
- Survey Expired: Used for the Email survey channel when the link has expired, and customers can no longer take the survey.
Each language will have its own content, displayed accordingly on the survey screen.
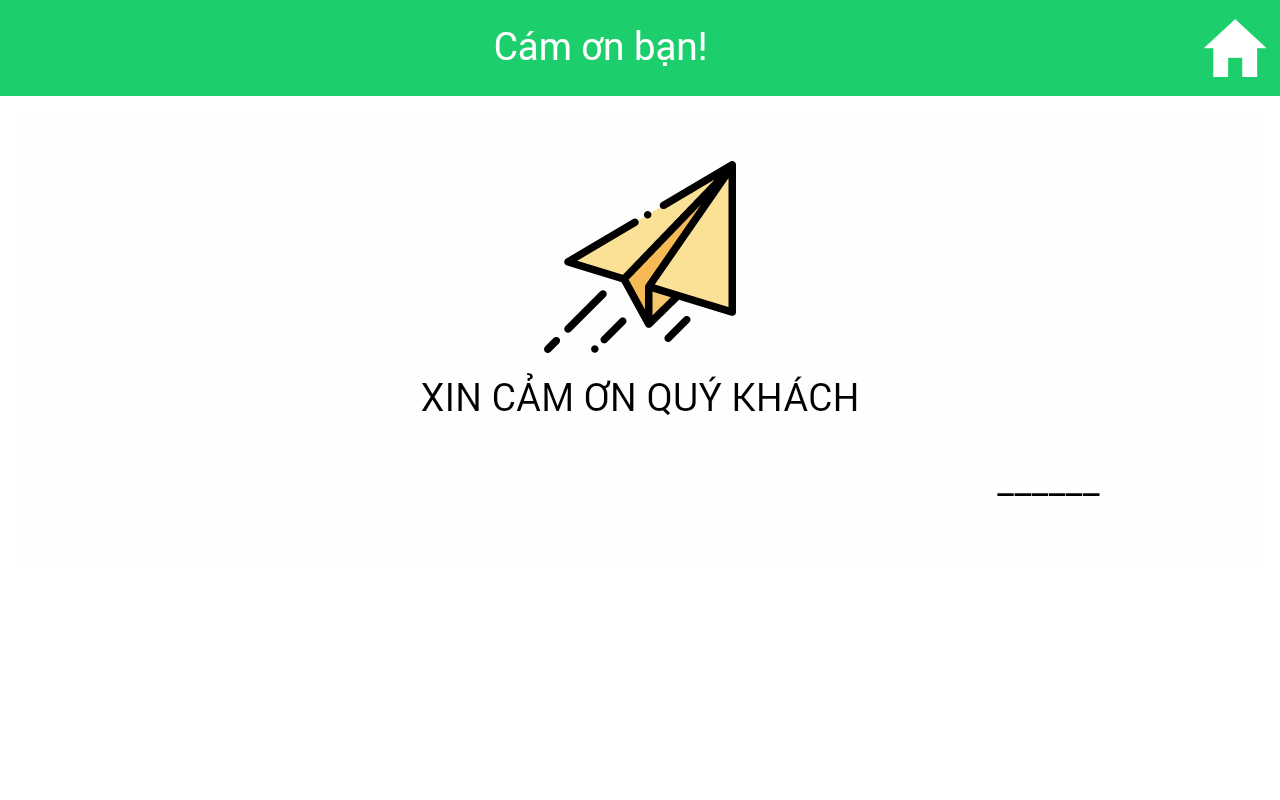
Appreciation messages are displayed after submitting the review
System Configuration
Language Configuration
The language configuration section is used to set the language on the survey device. Currently, we support 5 different languages on the evaluation screen, including:
- Vietnamese
- English
- Korean
- Chinese
- Russian
Before conducting customer surveys, users can switch languages on the evaluation screen. You can specify the language to be used on the survey device and set the default language.
Change Language During Survey
Note: When you enable both languages, content must be entered for both languages in feature settings such as survey creation, application setup, and appreciation messages.
General Configuration
 General Configuration
-
Background Image: You can display a background image in the survey to increase visibility and make it more prominent.
-
Survey Header Image: You can set to display a logo and banner image at the top of the survey to enhance visibility and prominence.
-
Thank You Page: To display the appreciation messages you added in the "Thank You" section, you can configure the thank you page as a full-screen page or a popup window. You can also set the duration for how long it stays on the thank you page.
Other Configurations
- Feedback timeover: Is number of seconds hearme station app waits for customer feedback. If there is not any action, this app will send unfinished feedback to system and return to first survey page
- Auto run collection page: After the set waiting period, the application will automatically transition from the evaluation state to displaying a slideshow of images/videos in the collection.
- Include contact fields (Name and phone number): Displays input fields for name and phone number in the Text Survey.
- Contact fields required: Mandatory input of name and phone number in the text survey is required before feedback can be submitted.
- Turn off welcome page in online channels: Turn off welcome page in online channels such as web, email, QRcode channels
- Primary Color: The main color used on the survey screen.
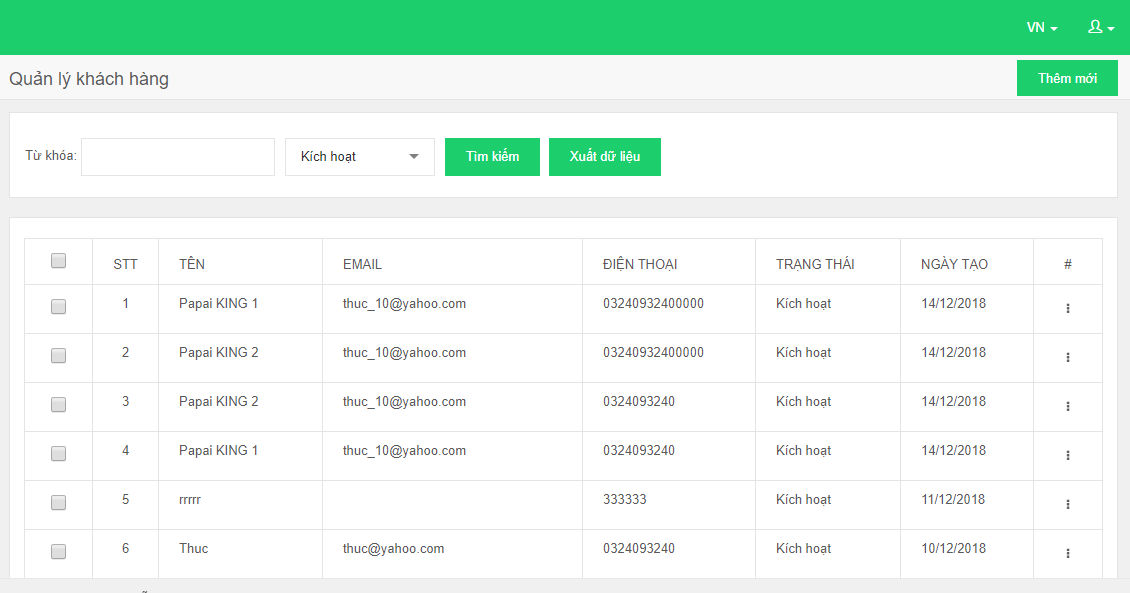
Customer Management
This section helps you manage customer information. For customers who provide their information while conducting surveys on kiosks or websites, you can "enter customers" to transfer the information to the Customer Management section.
You can also manually update customer lists to send email surveys to those customers. There are two ways to add customer information.
Customer List
Customer Management
In the Customer Management section, you will have the following tasks:
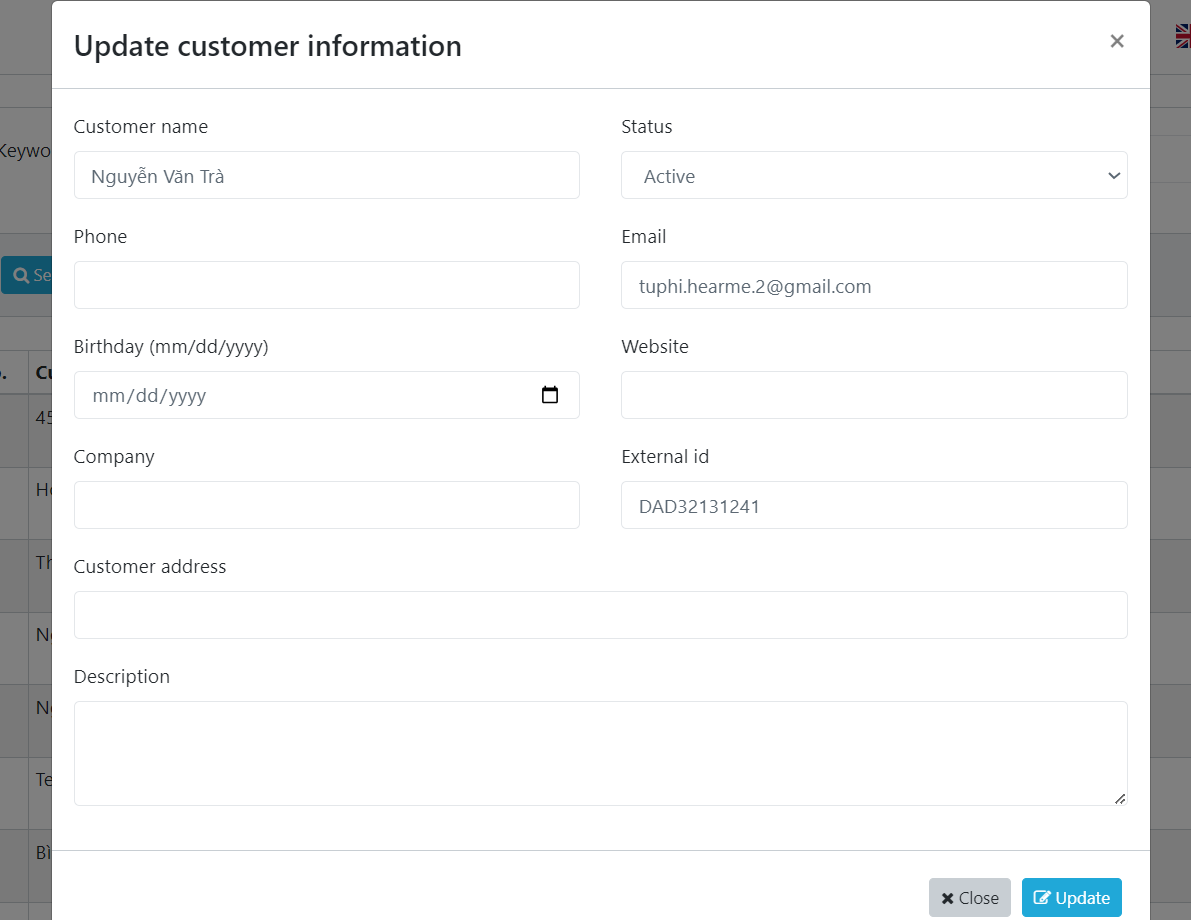
- Update Information: Add/Edit customer information.
- Invite Survey: Send surveys via email to customers.
- Survey Link: Get the unique survey link for a customer to send via email.
- Invitation History: Review the history of surveys invited to customers.
- Feedback History: Review the feedback history of customers.
Customer Management Tasks
Adding a New Customer
Add New Customer
Uploading Data
*Upload a customer list by selecting "Upload Data." You can download the template file here: Customers.csv
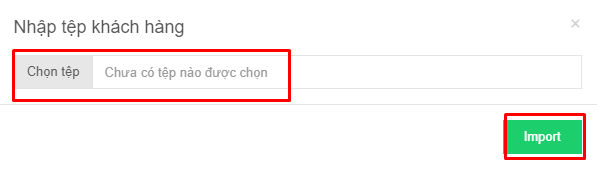
Upload Customer Data
You can also update and modify customer information.
Update Customer Information